Saturday, November 14, 2015

The stoning is over, the tiling is surging

The stoning is over.  The hearths have been built onto the fireplaces, the chimneys are done, so we bid adieu to the stonemasons.  We are very pleased with the quality of their work, including their artistic eye.

The tile work continues to surge.  The team was working among hallways, bedrooms, closets, and bathrooms which all require a lot of cutting.  This slows down the process considerably.  On Thursday, they hit the big fairways of the Great Room and foyer, and have begun work in the Conservatory.  The team leader claims they are on time to finish by Wednesday.

Our flatwork progress has been impeded by the rain earlier this week.  Since the temperatures are down, we need some bright sunshine to accelerate the drying process.  Right now, the flatwork is not in the critical path, but our concern is that it may be since we have entered "the winter months", which means more precipitation is likely.

Things will cascade rapidly after the tile work is done.  Electrical, A/C, low-voltage, etc., all come rolling down toward closing.  For now; however, here are some recent pictures:

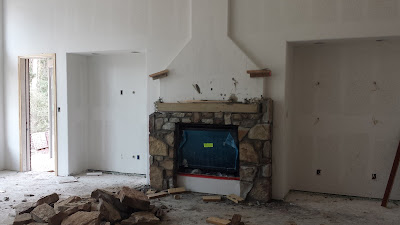
The main focus of this picture is the fireplace hearth, which looks rather
'dinky' compared to the rest of the stonework.  This happens when the
masons fail to look at the plan.  Secondarily, the tile team has broken out
into the Great Room

Ahhh, that's better!  The hearth has been built-out per plan, and looks much
better.  Progress on the floor is rapid.  The dog in the background is the
local Welcome Wagon service.  He is a black Labrador named Remington,
and lives across the street.  He has been with us throughout the building
process, even before we turned first-dirt.

Head-on picture of the fireplace, looking much more like it belongs.

The fireplace on the lanai is now complete.  It too, had a 'dinky' hearth like
the Great Room fireplace, but we got it fixed per plan.

This was an idea the construction manager recommended while we had some
stone left over: make a stone threshold on the entrances to the house
and casita.  This photo is from the casita.  The stonework is done.

We have another tile team working, and
they are doing the bath areas.  This is a
shower which is associated with what the
plans call "Bedroom #4".

The floor tile people have progressed into the foyer and are extending into
the Conservatory.  With the closet and the piano nook, some extra cutting
will be required.  In general; however, it will move quickly.

Thursday, November 12, 2015

Outside and inside

We had as many as FIVE trades at the house today: stonemasons, shower walls, flatwork, floor tile, grading.

The stonemasons worked to finish the chimneys today.  They also thought they had finished the hearths, but they did not build to plan (the plans are RIGHT THERE, not 20 feet away!).  I contacted the construction manager about it, and told them it would have to be redone.  This is one of the reasons I am out there almost every day, to catch things early, while the trades are on site and fixes can be made without re-scheduling.

The shower wall team made their installations today.  An engineered product is used in wet areas (like showers and baths) to provide the surface for installing wall tile.  The engineered product is generically referred to as "cement board", which is like Hardieplank for interior walls.

The flatwork team was out to survey the site and drop-off material needed to form the areas for cement and asphalt.  We had heavy rain over the previous weekend, so we weren't really ready for them.  As part of the effort, we brought in a grading team to smooth out the drive areas and encourage more rapid drying.

The floor tile team continues to progress.  In the Bedroom #2 and Master Bedroom Suite, there are a lot of cuts to be made for closets, utility room, bath areas, and hallways.  This part of the house requires a lot of cuts be made, which slows the progress.  They are about to hit the big fairways of the kitchen, Great Room, foyer, dining room, and Conservatory.  They will pick up speed over the next few days.  They are on target to complete by November 18, 2015 (cabinets are scheduled to arrive on the 19th).

Here are a few pictures, from the outside-in:


This is where the driveway will pass in front of the house, after it has been
coarse graded to dry and prepare for forms.

The wires sticking out of the wall is where the electrical and data services
will come into the house.  The actual circuit breaker panel will be inside.

The rear of the house, with the chimney being stoned.  The chimney was
completed later in the day, but I forgot to photograph it.  Manana.

The lanai chimney is done.  Now that both chimneys have been completed,
the exterior of the house is 99.9% complete.   There is a little trim work and
paint touch-up remaining.

This is the floor of the casita, after it has been installed and wiped clean for
grouting.  This is taken from the French doors, which access the porch.

This is the cement board being installed.  The
guest bathrooms do not have windows, so the
tradesmen have to provide their own light.

Tuesday, November 10, 2015

Things continue to roll...

The last couple of days have been good, with two trades working -- stonemasons and flooring.  It looks like we will have some overlap in work areas, but we have a plan in place so neither is slowed.  Maintaining fluidity for the trades is key to finishing on time.  We are expecting two additional trades this week: flatwork and electrical.

Here are pictures from today:

The tile has begun in the master bedroom.  This was taken about noon, so
it is likely this has been completed by the end of the day.  That means they
are about a third through the main house, right on schedule.
The stone is finally being applied to the chimneys.  Purchasing failed to
order the thin stone required for the chimneys, so we had to wait until the
new order could be filled.  It is nice to see it finally going into place.

The other half of the previous shot, showing how the two chimneys will
actually look when finished.  We are pleased with the stonework.

The Great Room's fireplace is almost complete.

The hearth remains to be built.

Monday, November 9, 2015

Trimming the tree...

No, this is not about decorating a Christmas tree.  We have a small forest as our property, but there is an oak tree we are trying to save.  It is the one which is seen in the front of the house in all the "perspective" photos.  Trees so close to construction are usually killed due to the ground being compacted, the surface being disturbed, etc., all of which contribute to suffocating the roots.  I used a four-inch (10 cm) auger to drill 10 holes around the tree to a depth of 2 feet (0.6 m).  I then dropped in some fertilizer, and back-filled the holes with small gravel.  The gravel allows the roots to get a lot of air and moisture.  As a result, this tree has thrived while we have others which are stressed, some severely.  I cannot do much for these other trees near our house until the final grade is complete.  Nonetheless, it looks like we will keep this nice tree, around which our driveway will curve.

This weekend I purchased a pole trimmer, which is essentially a small chainsaw mounted on a nine-foot (2.7 m) pole.  With it, I can reach branches which need trimming on these mature trees, relieving them of what I call "sucker growth" (unwanted branch growth) which takes nutrients and energy from the tree.  Since the tree will no longer feed these branches, it will typically have growth in the remaining upper branches.  That's the theory, and seems to work out over my experience in trimming my own trees as a homeowner for over 35 years.  On this particular tree, it had sucker growth which certainly detracted from its looks, but also was taking energy a stressed tree could ill afford.  In previous pictures of the house, these branches covered the front entrance to the house -- not completely, of course, but that is where one would look for comparison.  Today's blog has but one picture, and not only is the tree trimmed, but it captures a rare moment in which the construction debris has been cleared.

Most of the construction debris has been removed, and the tree is trimmed -- it took the entire length of the pole trimmer
and me reaching as high as I could to cut some of the branches.  My guess is that the highest branch I reached was
about 14 feet (4.3 m) above the ground.  The tree looks better, and can put more energy in growing outward and upward.

Friday, November 6, 2015

A little color, a little tile, and a little direction

This week is all about the interior, although there was no reason for it to be that way -- except the availability of the flatwork trades.  Fortunately, the flatwork is not in the critical path (yet) and it looks like it will begin next week -- all good.  The interior painters have made great strides (despite the misstep of painting the casita the wrong color).  The tile team has completed the casita, and are ready to move to the main house.  Now, if the stonemasons would show up with some mortar...

On with the pictures from today:

The walls are painted (Pittsburgh Paints "Bear Hug"), and the ceiling paint
("Navajo White") has begun.

This is the master bedroom (MBR) with its tray ceiling, all in the planned
paint scheme.  The crown molding color is "China White" .
The ceiling in the Conservatory, also a tray ceiling.

The floor in the casita is installed; it is tile which looks like wood.  All that
remains is the grouting and thresholds for the doors.

The lanai fireplace with its new mantle -- solid cedar.  The hearth is
still not complete, but that should happen in the coming week, along
with the chimneys and inside fireplace.
Oh yeah, the garage doors were installed today, all four of them.  Here are two of them.  In total, we had four trades on
location today at various times, so this was an exceedingly good day for progress.

Tuesday, November 3, 2015

Advancing...

We are moving forward, and things will be popping as we head into the last six weeks (fingers crossed).  We start interior paint today, and tile starts tomorrow. Once the tile team enters the building, very little can happen inside until they are done. Meanwhile, there is exterior work to do such as the flatwork (driveway, car park, and sidewalks), exterior paint, stone on the chimneys, etc. The tile will take two weeks and then cabinets arrive on site.

I hope the reader realizes that my blogs are about the process of building a home from the owner's perspective, and the owner gets educated along the way.  In other words, this blog is for all who plan to build their own home one day, as well as our friends and family who are interested.  That being said, I have one word for today: cabinets.  When you build a custom home, things as mundane as cabinets become custom as well.  Why?  Your walls are custom, and cabinets have to fit on the walls and still look nice -- like they belong.  Our cabinets are being built off-site, and none are like the ones you might purchase at the local DIY store, all of which have "standard" widths, heights, and depths.  Add to the fact that we have more than a couple of spaces with custom built-ins, and it gets complicated (read time-consuming) very quickly.  Further, the cabinets cannot be ordered until after framing, when all the measurements can be verified.  Being 1/8 of an inch (3mm) too small is perhaps manageable, being 1/8 of an inch to wide, perhaps not so much.  We have both a lot of cabinets and a lot of built-ins in this house, and they are not yet ready.  Fortunately, we can put in the flooring tile before the cabinets and not lose time.  On the other hand, a lot of our electrical is integrated with the cabinets and not just the walls, so we cannot do the electrical trim-out until the cabinets are in place, and that will cost us a couple of days.

Trade crews will not come in and do a partial project -- they are too busy for that.  The painters are the exception, since things which need painting appear in different places along the timeline.  We cannot get the electrical team in, for example, to do half of the trim-out now, and half a day or three later.  The trades want to send a full team, knock out the job, invoice the job, move to the next job.

Enough about education, and on to a couple of pictures:

The faux beams in the Great Room are installed.  There are four pairs
of beams connecting to the large central beam, which is 19 feet (5.8 m)
above the floor.

The one purposeful solar element we have in the house is a solar tube for the pantry.  The rest of the house has many
windows and a great deal of natural light, and we extend the natural light into the pantry.  This view is looking from the
pantry through the ceiling; the silver elements are the A/C ducts.
The completed solar tube, powered only by the sun.  At the time this picture was taken, it was late afternoon and the
sun was on the other side of the roof from the solar tube's access.  It is a beautiful soft light.

Saturday, October 31, 2015

Pockets and closets

I dropped by today, knowing the crew had been out there yesterday, and found the full trim crew working hard and fast.  I really did not expect to see them here, but they are trying to get done with all the trim work before the end of business today.  The painters are scheduled to return on Monday and the trim work must be finished.  We have one hiccup -- the double-doors to the MBR were not delivered.  A lot of painting can get done while we wait.

We have the shelving in all closets completed, with additional horizontal support trim added to the shelves.  Most of the pocket doors have been installed as well.  The kitchen beams had already been installed when I arrived today, and the beams in the foyer were a work in progress.  The team leader told me that they would complete the beams in the Great Room today, also.  That is quite a bit of work left to do, as these are "faux beams" constructed from cedar into long rectangular "boxes".  Because the beams attach to the ceilings, they must be assembled in-situ in order to keep the mass safely manageable.  The effort and quality of work are high, and appreciated deeply by the homeowners.

Here are the pictures:

Taken from the "coffee station", one can see the faux beams of the kitchen
looking toward the Great Room's window mosaic.  They add dimension to
room, and warmth.

The faux beam in the foyer being constructed in-situ shows the challenges
of working up high.  Each beam is constructed one piece at a time, and are
being constantly measured to make sure they get it right the first time, as
there is almost no extra material.

This is the pocket door between Pam's
office and the bathroom, and the first one
I noticed as being installed.
My closet, with shelves installed but not finished out, and
the pocket door peeking from its new home.
This close-up of the shelves show the support front trim which is being
added.  In the previous picture, the support trim was not yet installed.


The main subject in this photo are the shelves to the right of the fireplace which, during the Christmas season, will be
home to Pam's Dicken's Village collection.  The wiring in the shelf area is installed to facilitate this use.

This is our first look at our cedar mantle.  One like it will be installed on the lanai fireplace.  It is exactly what we wanted.

Wednesday, October 28, 2015

Crowned...

We are at a materials logjam right now, in that the lack of materials have stymied progress.  We had only 21 of 31 doors shipped (somebody needs their backsides booted), we ran out of mortar (how can these guys not know they were running out of mortar?  Oh! Squirrel!), and we are still waiting for the thin-cut stone for the chimney (No Virginia, we cannot slice large stone blocks like salami at the worksite).

However, we did get crowned, and that is progress.  It is a step which needed to be completed, and if it is not completed at this moment, then it is at least 90%+ completed.  At some point in the near future, the cement board/wall tile of all forms/sink and bathroom fixtures trades team will come, but whether it is done before or after painting I do not know.  My guess is "after".  Shelving is not quite done, but 10 of the 14 closets are built-in.  The next few days could be very interesting or very boring, but for now, here are some pictures of the crown molding:


The crown molding applied to the dining room, accenting a tray ceiling, which is featured throughout the house.
Here is the crown molding in the Conservatory, showing the piano nook and
closet.  The Conservatory is opposite the dining room and features a tray
ceiling as well.

The master bedroom and its trim of sills, frame, and crown molding.  There
is a tray ceiling here, also.

Saturday, October 24, 2015

Hearths and shelves

At this phase of construction, progress is measured in small steps Most of the outside work is done, so there will be no dramatic WOW! visual moments going forward, with the possible exception of the fireplace and its associated shelving and cabinetry.  Nonetheless, details are important, and we are glad to be moving ahead with them.  It is always exciting to see things progressed from concept to reality no matter how small the detail.  Today's pictures are all about the small details and the excitement of them representing steps not only toward the completion of the house,  but expanding our visualization of how things will be.

Pictures of the lanai hearth in progress.  From the corners of
the hearth as shown, the stone will drop at 90 degrees to the
edges of the lanai.  The extension in front of the fireplace is
20 inches (51cm), and at the sides will be 12 inches (30cm).
  
Pam's walk-in/dress-in closet gets its first shelves.  There will be a built-in
chest of drawers in the middle (if it were there, I would be taking this picture
over it) of the closet.  She will have plenty of room for clothes and shoes. 

This is Pam's closet immediately to my right from the previous picture with
more shelves and a nice hang-up area.

This is the "Christmas Closet", which is in the main hallway leading from
the Great Room toward the MBR.  Its first shelf is rather high, owing to the
fact that the Christmas tree, it its canvas storage container, will be kept here.

This is the pantry, and yes, the blank space at the right is as it should be.
We will be putting a refrigerator in the pantry for additional cold storage.

Wednesday, October 21, 2015

Moving along on the inside...

Today was a good day as the trim carpenter was there to hang doors and install shelves, and window sills.   The work continued on the inside fireplace, but it is going slow. They have also started working on the hearth for the outside fireplace, the one associated with the lanai.

 The trim carpentry team has 21 doors and shelving to install for 18 closets and two pantries. In their first five hours of being on duty, they had fully installed 6 doors. By the same time, they had also installed many windows sills. The team seems to be making good time, and should be finished with their task by the end of the week. Once they have completed their jobs, the painting team will return.

Here are some pictures from today:

The fireplace in the Great Room is slowly creeping upward...

Meanwhile, the Conservatory gets its French doors (the windows on the
door have a protective material on them).

Once inside the Conservatory, one can see that the window sills are installed.
Many of the window sills have been installed throughout the house.

This is the linen closet off of Bedroom #3,
which is the left bay window bedroom.  The
doors are hung and shelving completed.

Returning to the Great Room, the window sills are installed on the window
mosaic, and framing has been added to the previously installed door.


Tuesday, October 20, 2015

"Everybody must get stoned..." (Rainy Day Women #12 & #35)

Even though the title is from a Bob Dylan song, circa 1966 from the great double-album "Blonde on Blonde", it was NOT about getting high or "stoned" on drugs.  If you listen to the lyrics, it is talking about something more closely akin to the Biblical version of "stoning".  Today; however, I am talking about "none of the above", what I am talking about is associated with masonry.  They started on the inside fireplace today.

Here are a couple of pictures of the fireplace in progress, as well as a couple of other "stoners":

They began work on the fireplace this morning, and this is their progress
to lunch.  Taken from the foyer entrance to the Great Room.

This is taken from the kitchen, and gives some context for the work at hand.
One part of the stonework which is slow and slows the mason is that of
hauling the stone into the room.  It is big enough that only one piece at a
time can be carried by one man.

Not exactly stonework, but because the
electrician did not run the wiring to this
floor outlet earlier, a little jackhammer
was required to correct the error.

This is similar to a picture I took the other day, but as the stone and brick
all been powerwashed, it is easier to the dramatic effect of the clean-up.

The photo above is taken in the porte-cochere from the main house to the
two-car garage.  The colors are much more vibrant after the powerwash.

All "stoner" on this one, focused on a section of the wall in the
porte-cochere.

Taken from the street, through the pines and oaks...